Create CT (component)
From UG
(→Parent Mantis) |
|||
| Line 4: | Line 4: | ||
== Parent Mantis == | == Parent Mantis == | ||
| - | [http://mantis.jaguarfreight.com/mantis/view.php?id=1638 | + | [http://mantis.jaguarfreight.com/mantis/view.php?id=1638 0001638: (CT: Create CT)..................<parent>] |
== Business Needs and Requirements == | == Business Needs and Requirements == | ||
Current revision as of 03:06, 26 March 2011
Contents |
[edit] Parent Mantis
0001638: (CT: Create CT)..................<parent>
[edit] Business Needs and Requirements
[edit] Technical Specification
[edit] Summary
This is the module in the system that controls how CT is created.
Create CT is a key operation.
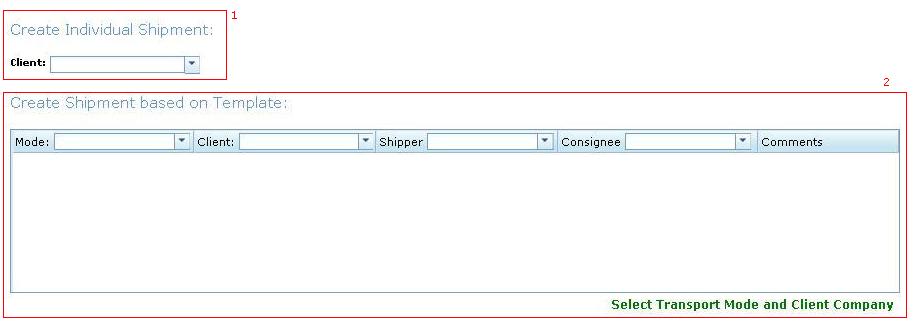
It is always done from Create CT Page. See #Figure 2: Create CT default
There are several ways to create CT at the moment.
Simplest way to create CT is to select Client Company and click "Create". In case of CT1 Client you would also have to enter CT#.
For details see below.
[edit] User Interface and Functionality
There are 2 sub-components related to "Create CT" feature in the system:
[edit] Create CT Page
Located at Ops Home > Create Individual Shipment
By default it looks like on Fig 2.
Depending on what Client you select CT1 Client or CT2 Client you will get slightly different view. See below.
Client field is required field.
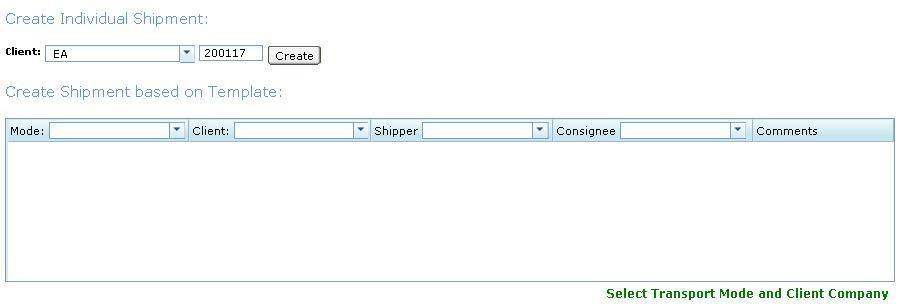
[edit] Create CT for CT1 Client
If system identified that you selected CT1 Client then it will present this view: #Figure 3: Create CT from CT1 number . User must enter CT# and click "Create"
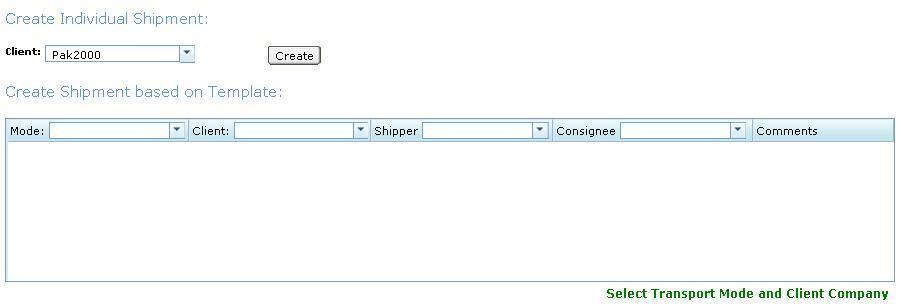
[edit] Create CT for CT2 Client
If system identified that you selected CT2 Client then it will present this view: #Figure 4: Create CT from CT2 number .
User must just click "Create" and CT number will be generated.
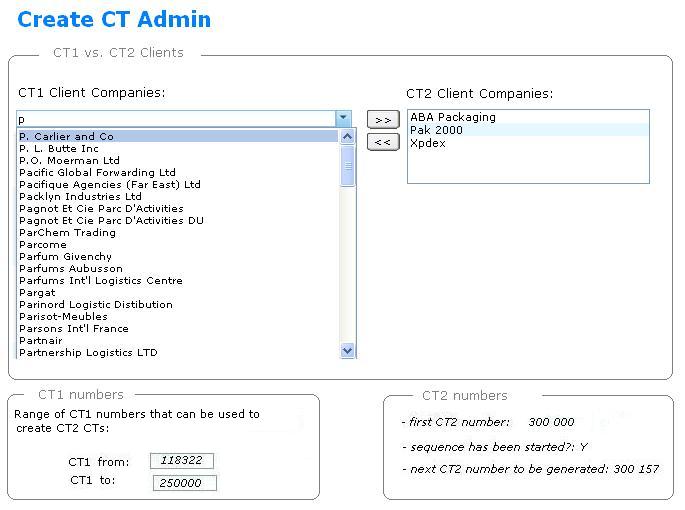
[edit] Create CT Admin
Located at Admin > Create CT Admin.
See UI here: #Figure 1: Create CT Admin.
This Admin controls / displays certain parameters related to Create CT functionality in terms of transition from CT1 Client to CT2 Client companies.
- CT1 vs.CT2 Client Companies
- here you can select what company is CT2 and what is CT1. At first all companies are CT1.
- CT1 from and CT1 to
- editable values that control CT1 number constraint (on Create CT page). If out of range system will give error pop-up "CT# must be between X and Y"
- first CT2 #
- hard coded value, read only
- sequence has been started?
- Equals to N until first CT2 created
- next CT2 number to be generated
- read only info
[edit] Create CT from Template
See UI example here:#Figure 5: Create CT from Template for CT1 Client
[edit] Look And Feel
At this point is up to developer.
[edit] Figures
[edit] Figure 1: Create CT Admin
[edit] Figure 2: Create CT default
[edit] Figure 3: Create CT from CT1 number
[edit] Figure 4: Create CT from CT2 number
[edit] Figure 5: Create CT from Template for CT1 Client
[edit] QA Plan
[edit] Test CT1 Numbers Range
- try different invalid conditions
....
....
....
[edit] History
[edit] Add capability to choose between Generate CT# and Enter CT# on per Client basis
- mantis: http://mantis.jaguarfreight.com/mantis/view.php?id=1636
- spec updated? Yes


