UG:Users Admin USER GUIDE
From UG
(→Example) |
(→See Also) |
||
| (69 intermediate revisions not shown) | |||
| Line 3: | Line 3: | ||
== Intro == | == Intro == | ||
| - | + | This is a complete list of users that have access to the CyberTrax system. It is a merged list of both Jaguar (internal) and non-Jaguar (client, shipper, planner) users, their profile settings, according to their user roles. Currently it is known that the [[AM]], with a select few of their team members, and the support of the isales team are creating new client users. As well as maintaining these users according to the client companies associated with their team. | |
== Common filters == | == Common filters == | ||
| - | Currently there are | + | Currently there are multiple ways in which users may filter through the User list: |
| - | + | * Active | |
| + | * Inactive | ||
| + | * Archived | ||
| + | * User Role | ||
| + | * Email Domain Name | ||
| + | * Search String | ||
| - | + | Users also have the ability to Manage and Save their filter settings, so that the system will remember their preferences the next time they access User Admin. | |
| + | |||
| + | See: [[#Double Click to Open Filters Panel]] | ||
| + | |||
| + | === Active === | ||
| + | |||
| + | This filter refers to the list of users who are currently "Active" and can access our application according to their [[#User Role]]. | ||
| + | |||
| + | '''NOTE:''' This is a default filter and the list will always default to show ALL active users when you access this menu. | ||
| + | |||
| + | === Inactive === | ||
| + | |||
| + | This filter refers to the list of users who are currently "Inactive" and can no longer access our internal &/or client applications. All "inactive" users are listed with their e-mail addresses grayed out and in italic font. | ||
| + | |||
| + | === Archived === | ||
| + | |||
| + | This filter refers to the list of users who are currently "Archived" and can no longer access our internal &/or client applications. All "archived" users are listed with a line going through their e-mail addresses, are grayed out and in italic font. | ||
| + | |||
| + | === User Role === | ||
| + | |||
| + | This filter is selected by way of a check box and can be set to 1 or many roles at the same time. Once you "Apply Filter" the system will search all users to find who has that user role set in their user profile. Currently there are 10 users roles available to choose from and are according to Jaguar & Non Jaguar user roles. | ||
'''Jaguar Roles (aka Internal roles):''' | '''Jaguar Roles (aka Internal roles):''' | ||
| Line 27: | Line 52: | ||
*Report User | *Report User | ||
| - | + | === Email Domain Name === | |
| - | + | An e-mail domain name is the 'name' listed inside of an e-mail address, it is found between the @ and .com So for IE cotyinc would be the e-mail domain name for all Coty client users as their e-mail addresses are users first_last name@cotyinc.com | |
| - | + | Previously this filter was a text box where users could enter and search through the list to find those users according to their e-mail domain name; now this filter is a drop down menu, containing the full list of users e-mail domain names. | |
| - | + | === Search String === | |
| - | === | + | This is s text field where users can type in a word or two and search the entire list to find their results. For IE, search the name John and the list will display all results found that contain this name in their profile (First Name, Last Name, Company Name, etc). |
| + | |||
| + | === Save Current Filter === | ||
| + | |||
| + | This option allows users to save any combination of filters that can be reused in the future, with an option to save them publicly, which can be utilized by other admin users. | ||
| + | |||
| + | === Manage Filters === | ||
| + | |||
| + | Here is where the user may find both their private saved filters and ALL public saved filters. | ||
| + | |||
| + | == User Admin == | ||
| + | |||
| + | === Go to Admin Menu >> Users Admin === | ||
| + | [[File:Admin - Users Admin.JPG]] | ||
| + | |||
| + | === Get list of Users === | ||
| + | |||
| + | This list is a combined list of all active users, both Jaguar and Non Jaguar. It contains the users e-mail address, First and Last Names, including their user role(s) that's set in their profile and their Company - City Address Name. Here is where the following "Core Actions" (Create, Edit, Remove, Archive and Restore) may be used for any user. | ||
| + | |||
| + | [[File:Users.JPG]] | ||
| + | |||
| + | === To Add New Jaguar User === | ||
| + | |||
| + | Select the "Add" option on the left hand bottom of the screen and a window will come up for you to create your new user. First you must select the appropriate Jaguar user role (Basic Ops, Super Ops, Basic Acc, Super Acc, Management, Sales). You will now see that all user profiles are broken down into 3 tabs - General, Additional and Dashboard Configuration Tabs. Here is where you can enter all relevant information for the user. | ||
| + | |||
| + | '''General Tab''' is where we enter the users e-mail address, their first & last names and select the users role. If they are a basic operator, super operator, acct, etc... | ||
| + | |||
| + | [[File:Adding New Jag Users.JPG]] | ||
| + | |||
| + | '''Additional Tab''' is where we select the users office affiliation, their Jaguar User Group, if they are a Sales Person, need to be listed on the client app communication center and if they are a credit note approval user? | ||
| + | |||
| + | [[File:Jag User Additional Tab.JPG]] | ||
| + | |||
| + | '''Dashboard Configuration Tab''' is used to select which dashboard reports the user will see on their CT home page. | ||
| + | |||
| + | [[File:Jag User DB Config Tab.JPG]] | ||
| + | |||
| + | === Add new Client User === | ||
| + | |||
| + | Select the "Add" option on the left hand bottom of the screen and a window will come up for you to create your new user. First you must select the appropriate role for your client user which is known as "Client User" AKA Non Jaguar user. You will now see that all user profiles are broken down into 3 tabs - General, Additional and Dashboard Configuration Tabs. Here is where you can enter all relevant information for the user. | ||
| + | |||
| + | '''General Tab''' is where we enter the users e-mail address, their first & last names and select the users role as ''Client User''. | ||
| + | |||
| + | '''Additional Tab''' is where we set the client users properties, their "E0 Client Company", their shipment visibility rules (IE, other client companies they have permission to access/view) and their company city address name. | ||
| + | |||
| + | [[File:Client Addtl Tab.JPG]] | ||
| + | |||
| + | '''Dashboard Configuration Tab''' | ||
| + | |||
| + | This is NOT currently used by Client Users and '''should not''' be selected. There is only one dashboard available and it relates to the Elizabeth Arden trucking domestic project. It is a rough DB report and is currently only used for demonstration purposes. As new DB reports are made available on the client application, they can and will be found here. | ||
| + | |||
| + | [[File:Client DB Config Tab.JPG]] | ||
| + | |||
| + | ==== Shipper User ==== | ||
| + | |||
| + | This role is currently used by EA Domestic trucking shippers on the ASN portal. It is here where the Shipper's information can be managed for the types of CT records that they can create and view. | ||
| + | |||
| + | '''General Tab''' is the same as above, but we select the users role as ''Shipper User''. | ||
| + | |||
| + | '''Additional Tab''' is where we setup the ASN Shipper's role according to the '''M'''ode '''o'''f '''T'''ransportation for the types of records they can create, the E0 client company that they are creating these records for, including their Shipper address company, city name and what type of weight value that they can use for the records they create. | ||
| + | |||
| + | [[File:Shipper Addtl Tab.JPG]] | ||
| + | |||
| + | '''Dashboard Configuration Tab''' | ||
| + | |||
| + | ''This is NOT currently used by Client Users and '''should not''' be selected.'' | ||
| + | |||
| + | ==== Planner User ==== | ||
| + | |||
| + | This role is currently used by EA Domestic trucking shipments created on the ASN portal. It is here where the Planner's information can be managed for which of the created Shipper CT records they can approve, place on hold, reject all for routing and viewing. | ||
| + | |||
| + | '''General Tab''' is the same as above, but we select the users role as '''Planner User''. | ||
| + | |||
| + | '''Additional Tab''' is where we setup the ASN Planner's role according to their part within the EA Supply Chain. Which shipments they have visibility to for them to view and approve for routing. | ||
| + | |||
| + | [[File:Planner Addtl Tab.JPG]] | ||
| + | |||
| + | '''Dashboard Configuration Tab''' | ||
| + | |||
| + | ''This is NOT currently used by Client Users and '''should not''' be selected.'' | ||
| + | |||
| + | === Edit Existing Users === | ||
| + | |||
| + | To edit an existing user, just double click on the user that needs fixing and save once all changes are done. Note, we still cannot change a users e-mail address after it has been created and should continue to remove it or archive it according to usual business practice. Select ''Remove'', if the e-mail address was never used to access the system and then press Ok. OR Select ''Archive'', if they have accessed the system, un-check the active check box set in their profile to make them inactive and press Ok. | ||
| + | |||
| + | === Remove, Archive & Restore Users === | ||
| + | |||
| + | No changes were made to these functionalities and they all remain the same. | ||
| + | |||
| + | === Double Click to Open Filters Panel === | ||
| + | |||
| + | Here you will find ''all'' available filters in which to select from, with the default filter setting of 'Active'. You can search by any combination of filters to get the results of users according to your set filter criteria. Above are the definition of what these types of filters can do. - See [[#Common filters]] | ||
| + | |||
| + | [[File:Filters.JPG]] | ||
== History == | == History == | ||
=== Ver 1 === | === Ver 1 === | ||
| + | |||
| + | *Implemented in Dec 2011 release | ||
| + | |||
| + | === Ver 2 === | ||
| + | |||
| + | *Covered in the above and implemented in Jan 2012 release | ||
| + | |||
| + | === Ver 3 === | ||
| + | |||
| + | *Covered in the above and implemented in March 6, 2012 release | ||
== See Also == | == See Also == | ||
* '''Link to CT2 User Guide:''' [[:Category:Support]] | * '''Link to CT2 User Guide:''' [[:Category:Support]] | ||
| - | * Link to spec: [[Users#SOW_2]] | + | * Link to spec: [[#Users#SOW_2]] |
Current revision as of 20:47, 16 March 2012
Contents |
[edit] Intro
This is a complete list of users that have access to the CyberTrax system. It is a merged list of both Jaguar (internal) and non-Jaguar (client, shipper, planner) users, their profile settings, according to their user roles. Currently it is known that the AM, with a select few of their team members, and the support of the isales team are creating new client users. As well as maintaining these users according to the client companies associated with their team.
[edit] Common filters
Currently there are multiple ways in which users may filter through the User list:
- Active
- Inactive
- Archived
- User Role
- Email Domain Name
- Search String
Users also have the ability to Manage and Save their filter settings, so that the system will remember their preferences the next time they access User Admin.
See: #Double Click to Open Filters Panel
[edit] Active
This filter refers to the list of users who are currently "Active" and can access our application according to their #User Role.
NOTE: This is a default filter and the list will always default to show ALL active users when you access this menu.
[edit] Inactive
This filter refers to the list of users who are currently "Inactive" and can no longer access our internal &/or client applications. All "inactive" users are listed with their e-mail addresses grayed out and in italic font.
[edit] Archived
This filter refers to the list of users who are currently "Archived" and can no longer access our internal &/or client applications. All "archived" users are listed with a line going through their e-mail addresses, are grayed out and in italic font.
[edit] User Role
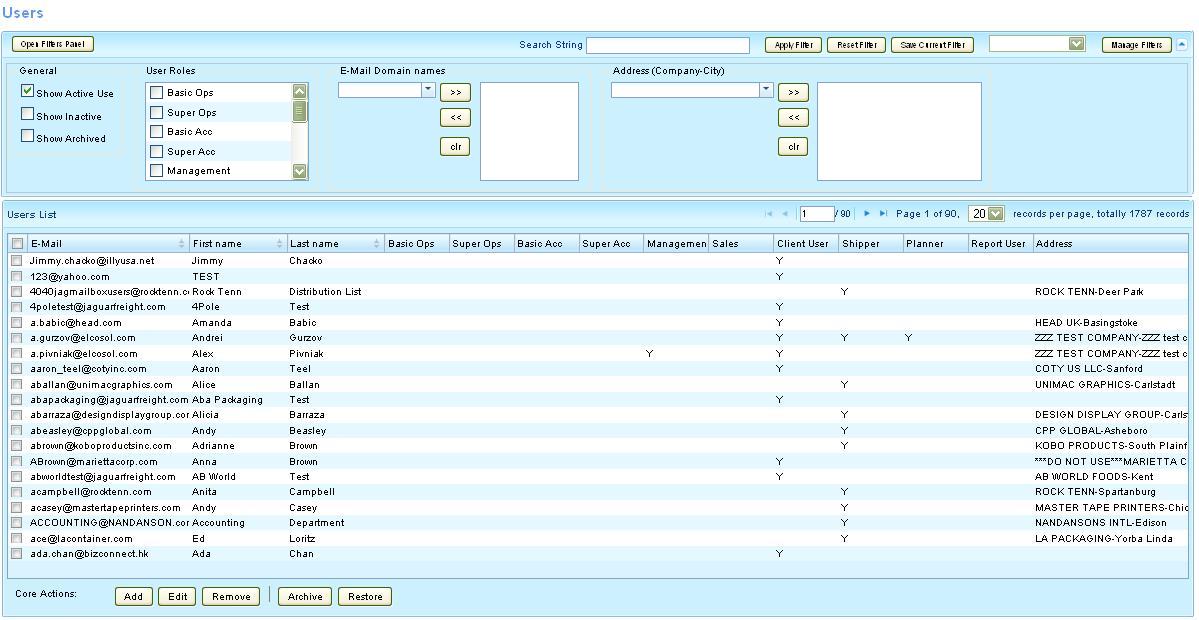
This filter is selected by way of a check box and can be set to 1 or many roles at the same time. Once you "Apply Filter" the system will search all users to find who has that user role set in their user profile. Currently there are 10 users roles available to choose from and are according to Jaguar & Non Jaguar user roles.
Jaguar Roles (aka Internal roles):
- Basic Ops
- Super Ops
- Basic Acc
- Super Acc
- Management
- Sales
Non Jaguar Roles (aka Client Application roles):
- Client User
- Shipper
- Planner
- Report User
[edit] Email Domain Name
An e-mail domain name is the 'name' listed inside of an e-mail address, it is found between the @ and .com So for IE cotyinc would be the e-mail domain name for all Coty client users as their e-mail addresses are users first_last name@cotyinc.com
Previously this filter was a text box where users could enter and search through the list to find those users according to their e-mail domain name; now this filter is a drop down menu, containing the full list of users e-mail domain names.
[edit] Search String
This is s text field where users can type in a word or two and search the entire list to find their results. For IE, search the name John and the list will display all results found that contain this name in their profile (First Name, Last Name, Company Name, etc).
[edit] Save Current Filter
This option allows users to save any combination of filters that can be reused in the future, with an option to save them publicly, which can be utilized by other admin users.
[edit] Manage Filters
Here is where the user may find both their private saved filters and ALL public saved filters.
[edit] User Admin
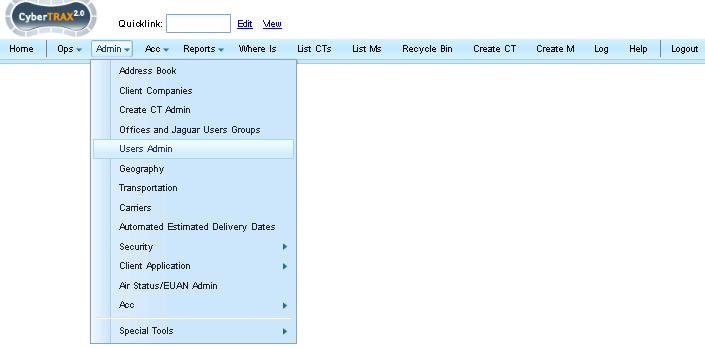
[edit] Go to Admin Menu >> Users Admin
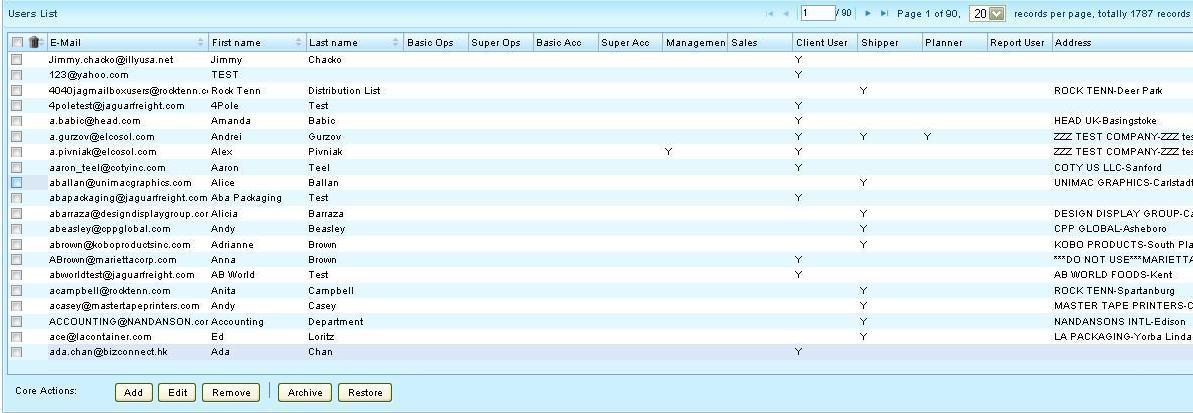
[edit] Get list of Users
This list is a combined list of all active users, both Jaguar and Non Jaguar. It contains the users e-mail address, First and Last Names, including their user role(s) that's set in their profile and their Company - City Address Name. Here is where the following "Core Actions" (Create, Edit, Remove, Archive and Restore) may be used for any user.
[edit] To Add New Jaguar User
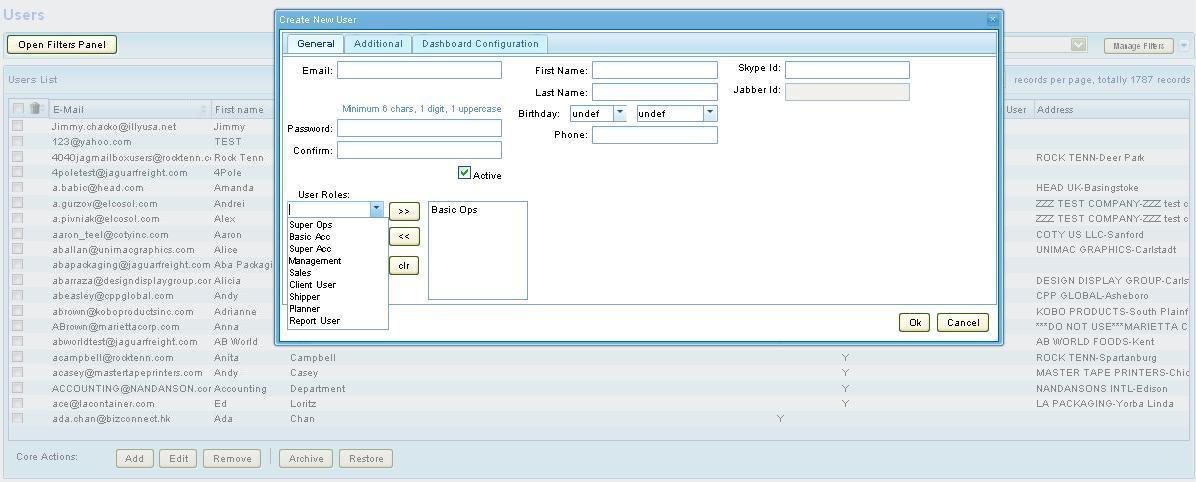
Select the "Add" option on the left hand bottom of the screen and a window will come up for you to create your new user. First you must select the appropriate Jaguar user role (Basic Ops, Super Ops, Basic Acc, Super Acc, Management, Sales). You will now see that all user profiles are broken down into 3 tabs - General, Additional and Dashboard Configuration Tabs. Here is where you can enter all relevant information for the user.
General Tab is where we enter the users e-mail address, their first & last names and select the users role. If they are a basic operator, super operator, acct, etc...
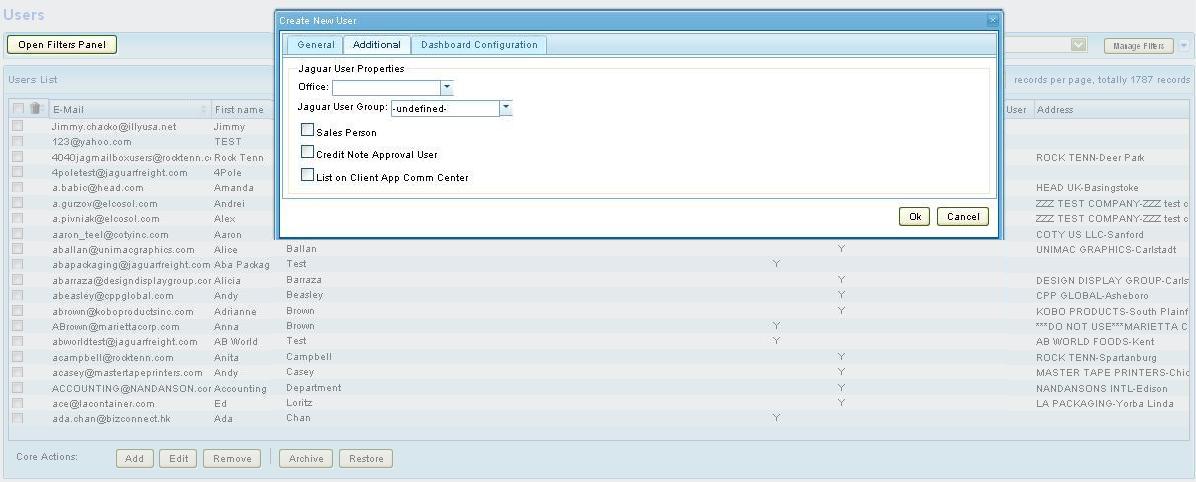
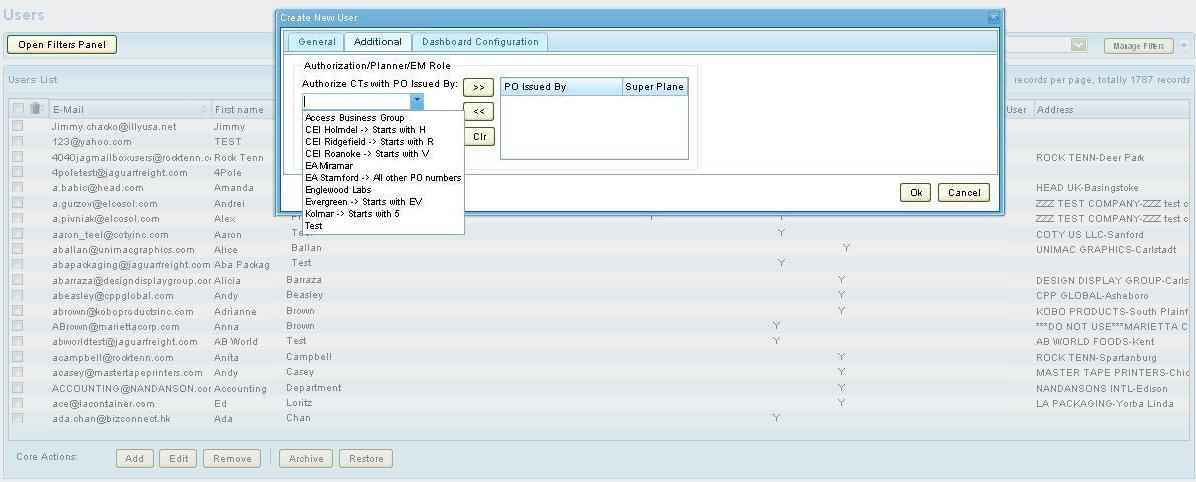
Additional Tab is where we select the users office affiliation, their Jaguar User Group, if they are a Sales Person, need to be listed on the client app communication center and if they are a credit note approval user?
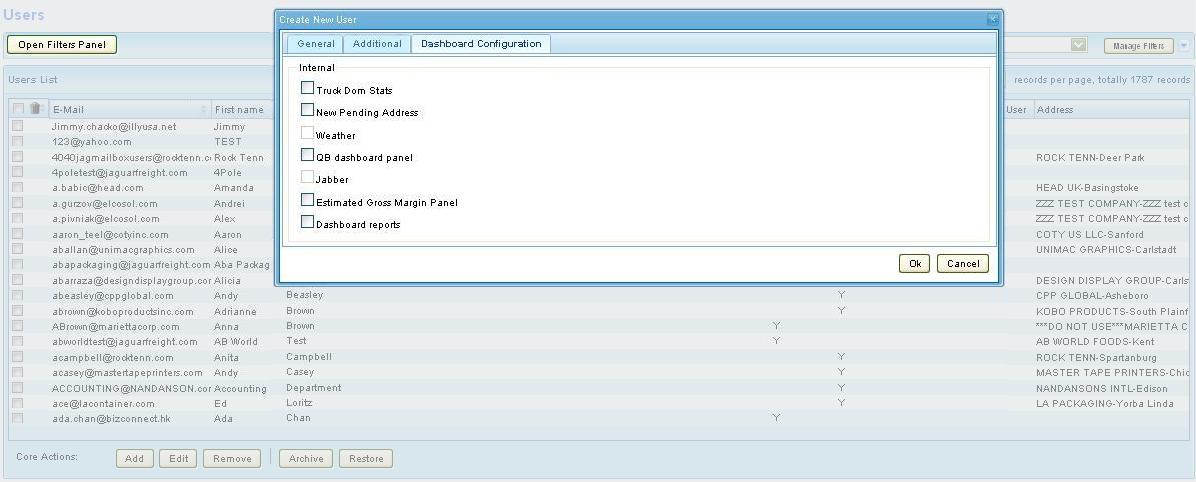
Dashboard Configuration Tab is used to select which dashboard reports the user will see on their CT home page.
[edit] Add new Client User
Select the "Add" option on the left hand bottom of the screen and a window will come up for you to create your new user. First you must select the appropriate role for your client user which is known as "Client User" AKA Non Jaguar user. You will now see that all user profiles are broken down into 3 tabs - General, Additional and Dashboard Configuration Tabs. Here is where you can enter all relevant information for the user.
General Tab is where we enter the users e-mail address, their first & last names and select the users role as Client User.
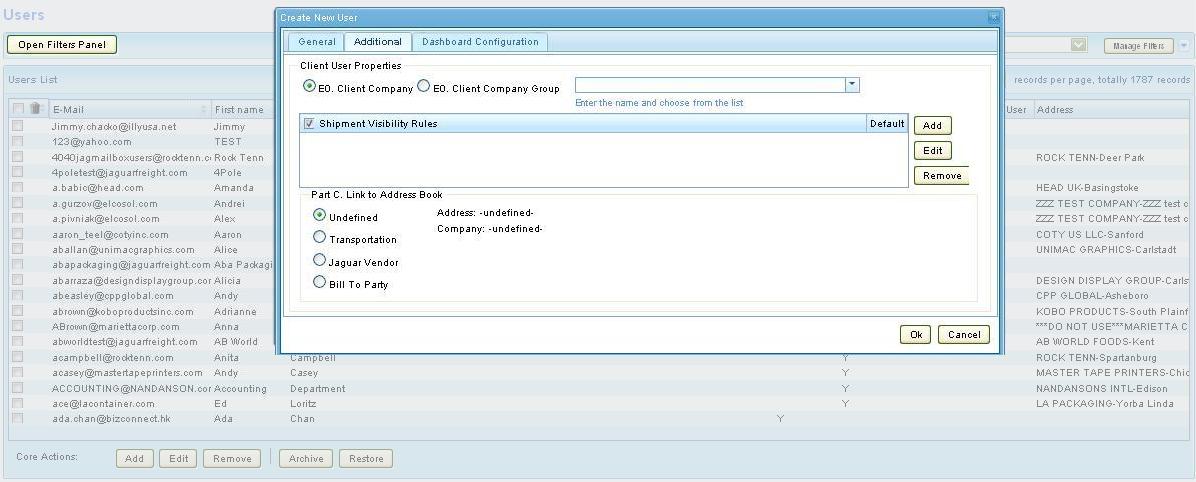
Additional Tab is where we set the client users properties, their "E0 Client Company", their shipment visibility rules (IE, other client companies they have permission to access/view) and their company city address name.
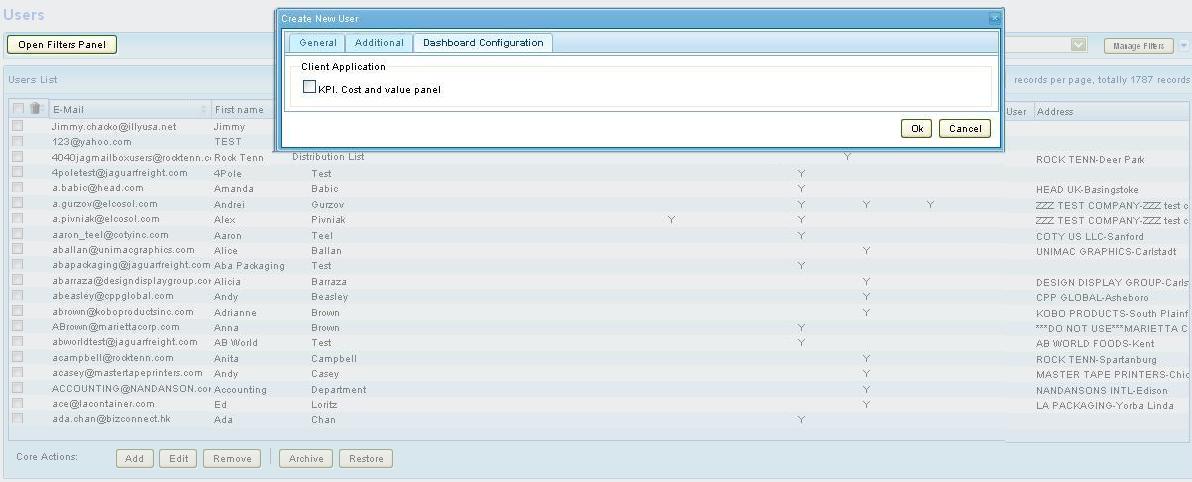
Dashboard Configuration Tab
This is NOT currently used by Client Users and should not be selected. There is only one dashboard available and it relates to the Elizabeth Arden trucking domestic project. It is a rough DB report and is currently only used for demonstration purposes. As new DB reports are made available on the client application, they can and will be found here.
[edit] Shipper User
This role is currently used by EA Domestic trucking shippers on the ASN portal. It is here where the Shipper's information can be managed for the types of CT records that they can create and view.
General Tab is the same as above, but we select the users role as Shipper User.
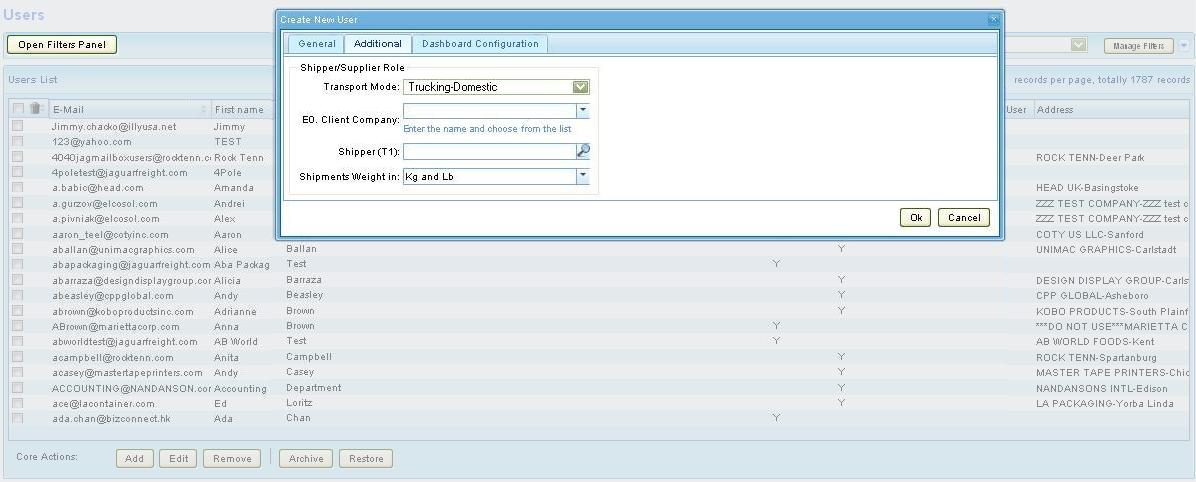
Additional Tab is where we setup the ASN Shipper's role according to the Mode of Transportation for the types of records they can create, the E0 client company that they are creating these records for, including their Shipper address company, city name and what type of weight value that they can use for the records they create.
Dashboard Configuration Tab
This is NOT currently used by Client Users and should not be selected.
[edit] Planner User
This role is currently used by EA Domestic trucking shipments created on the ASN portal. It is here where the Planner's information can be managed for which of the created Shipper CT records they can approve, place on hold, reject all for routing and viewing.
'General Tab is the same as above, but we select the users role as Planner User.
Additional Tab is where we setup the ASN Planner's role according to their part within the EA Supply Chain. Which shipments they have visibility to for them to view and approve for routing.
Dashboard Configuration Tab
This is NOT currently used by Client Users and should not be selected.
[edit] Edit Existing Users
To edit an existing user, just double click on the user that needs fixing and save once all changes are done. Note, we still cannot change a users e-mail address after it has been created and should continue to remove it or archive it according to usual business practice. Select Remove, if the e-mail address was never used to access the system and then press Ok. OR Select Archive, if they have accessed the system, un-check the active check box set in their profile to make them inactive and press Ok.
[edit] Remove, Archive & Restore Users
No changes were made to these functionalities and they all remain the same.
[edit] Double Click to Open Filters Panel
Here you will find all available filters in which to select from, with the default filter setting of 'Active'. You can search by any combination of filters to get the results of users according to your set filter criteria. Above are the definition of what these types of filters can do. - See #Common filters
[edit] History
[edit] Ver 1
- Implemented in Dec 2011 release
[edit] Ver 2
- Covered in the above and implemented in Jan 2012 release
[edit] Ver 3
- Covered in the above and implemented in March 6, 2012 release
[edit] See Also
- Link to CT2 User Guide: Category:Support
- Link to spec: #Users#SOW_2
